Create VPN
In this section, you’ll learn how to set up a VPN using ZEVENET appliance, and how to configure it using various VPN profiles.
The image below shows the starting interface.
When you click the Create VPN action, it’ll open a form that looks similar to the one in the image below.
Use the Name field to give the VPN a suitable label, and the profile to select the VPN type to implement.
When you click through the profile field, it’ll show 3 VPN profiles that you can select from. These profiles are:
ZSS. This type is a ZEVENET Site to Site VPN. This mode could be used from clients to load balancer or load balancer to real servers. ZEVENET will be the default gateway for each local and remote subnets. IPSEC implementation.
ZTN. This type is a ZEVENET Tunnel VPN. This mode creates a GRE tunnel over IPSEC implementation, also could be used from clients to load balancer or load balancer to real servers. ZEVENET will be the default gateway for each local and remote subnets.
ZRS. This type is a ZEVENET Remote Site VPN. ZEVENET acts as a VPN server, so the clients could connect to such VPN and they will assign a dynamic IP address to be routed later on via the routing system. IPSEC implementation in server mode for clients in mode road warrior.
Refer to the figure below.
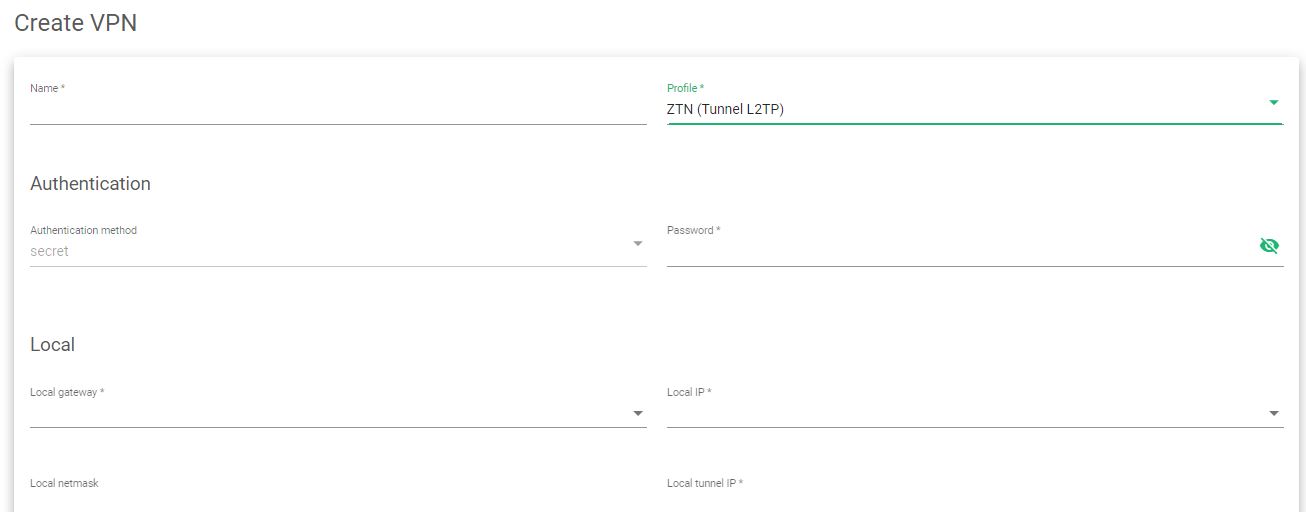
When you select any of the options, let’s say ZTN (Tunnel L2TP), it’ll open a wider form with more fields for you to fill. Follow the instructions carefully and fill out the form with the necessary details.
The image below shows a glimpse of what the fields would look like.
Here is a brief description of the fields you’ll fill in the form.
Authentication
Configure the VPN Authentication method.
Authentication method. The method used to verify submitted credentials. This method is usually kept a secret.
Password. Your user password for accessing the VPN.
Local
Configure the VPN Local Network.
Local gateway. The default gateway used by the local server to access resources on external networks.
Local IP. The network layer IP address of the local server if it is configured. Supports both IPV4 and IPV6.
Local netmask. The subnet mask of the local server if configured. You must configure this local netmask at the time you set up the IP of the local device.
Local tunnel IP. The IP address of the local tunneling host if it is configured. Supports both IPV4 and IPV6.
Local tunnel netmask. The subnet mask of the local tunneling host. You must configure the netmask at the time when you configure the IP address of the local tunnel.
Remote
Configure the VPN Remote Network to be connected.
Remote gateway. The default gateway used by the remote server to access resources on external networks
Remote IP. The network layer IP address of the remote server if it is configured. Supports both IPV4 and IPV6.
Remote netmask. The subnet mask of the remote server if configured. You must configure this remote netmask at the time of configuring the IP.
Remote tunnel IP. The subnet mask of the remote tunneling host. The netmask must be configured at the time when you set up the IP address of the remote tunneling host.
Phase 1
Configure the VPN Phase 1 for crypto security configuration if required.
Authentication. IKE Phase 1 negotiation algorithm that checks the integrity of a request.
Encryption. Encryption algorithms used for securing data packets against packet sniffing.
DH group. An algorithm that provides secrecy of data shared between two unprotected VPN endpoints.
Phase 2
Configure the VPN Phase 2 for crypto security configuration if required.
Protocols. The type of IPsec protocol to be used for authenticating the packets shared over a network.
Authentication. IKE Phase 2 negotiation algorithm that checks the integrity of a request.
Encryption. Encryption methods are used for securing data packets traversing over a network.
DH group. An algorithm that provides secrecy of data shared between two unprotected VPN endpoints.
Pseudo random function. An algorithm that creates randomness, solely for keying purposes.
Both IPv4 and IPv6 stacks are supported, taking into account that the Netmask and Gateway have been configured in the same stack as the IP address.
After confirming that all the required fields have been filled, click the Apply button to create the new VLAN interface.


