How to load balance Oracle JD Edwards
Overview
The goal of this article is to explain how to configure the SKUDONET Load Balancer for offering High availability and load balance service to JD Edwards, this configuration will allow the continuity of the service behind any failure.
Contents
Load Balancing is a technique used by the application delivery controller software that offers the IT system the capacity to scale easily, create total availability, and not lose the service in case some part of the IT architecture fails. SKUDONET offers the possibility of load balance JD Edwards adding the following features:
- The user sessions are saved and persistent in case a failure is detected in one of the JD Edward servers that built the IT architecture.
- Increase of concurrency, as the load balancer offers the capability of configuring more than one JD Edward server in case one of them fails, the other can continue with the service.
- The sysadmin team can update part of the JD Edwards’ servers without losing the service, and the other servers can continue working and managing users without concern.
Oracle JD Edwards EnterpriseOne
Oracle JD Edwards EnterpriseOne is a suite of Oracle Applications that are built to offer ERP services (Enterprise resource planning), in the list of services offered by an ERP includes, voice calls, planning, invoices, purchases, financial activities, sales and marketing, inventory, delivery, shipping among others.
To continue with the configuration of JD Edwards in high availability for high performance and scalability it is required to deploy a SKUDONET Application Delivery Controller appliance on-premise or on cloud.
Please refer to our load balancing solutions in case you have not deployed a SKUDONET appliance yet.
The information you will find in this article works for SKUDONET Enterprise 6.3 and later versions and for SKUDONET Community 7.0 and later versions.
The environment we are going to describe is the following:
SKUDONET Application delivery controller can configure the Weblogic applications service (JD Edward frontends) in high availability in two different ways, please use one of them based on which one fits better your needs.
- SKUDONET ADC will be configured with an L4XNAT profile (mode 1), the TCP traffic will pass through the load balancer.
- SKUDONET ADC will be configured with an HTTP(S) profile, the application data is forwarded and decisions can be taken based on the HTTP Headers.
Follow the indications that better fit your needs.
Before starting to configure the Weblogic replication data service
JD Edwards server offers mechanisms to avoid any session data loss, Weblogic offers the cluster service, and this cluster replicates information related to the sessions, in case one of the Weblogic instances fails, the session related to the client created in this instance will be available in the other available servers. This capability ensures that the information related to the session isn’t lost but this service doesn’t offer load balancing, scalability, and high availability completely, for that we will use the SKUDONET Application Delivery controller.
The configuration of the WebLogic cluster is out of this scope, please refer to the official documentation.
Configure the farm in L4XNAT, mode 1
Step 1: Virtual IP configuration
In SKUDONET ADC a virtual IP is an IP used for load balancing purposes, the same Virtual IP can be configured in more than one farm, but the same Virtual IP can’t be configured with the same Virtual Port in more than one farm. To create a new Virtual IP in case it is required please go to the SKUDONET web GUI, section Network >> Virtual Interfaces, and click on the button Create Virtual Interface.
In the new form for Creating a Virtual Interface, select the parent interface where to configure the new virtual IP, click on Virtual Interface name, choose a descriptive name, and finally configure an IP in the field “IP address” in the same network range as the parent interface.
Following our example:
Parent interface: eth0
Virtual Interface name: eth0:0
IP address: 192.168.56.200
Step 2: Configure the JD Edwards farm for TCP load balancing
A farm is a virtual concept in the SKUDONET Application Delivery Controller, with a farm the SKUDONET captures the client’s traffic and forwards the request to the different servers that build the application cluster for high availability. To achieve this go to LSLB >> Farms.
Click on Create Farm and in the new form, select a descriptive name, in this section, we will configure a farm in Profile L4xNAT. This profile offers high performance load balancing system at transport layer 4 and combines multiple load balancing methods like, for example, Source NAT and Destination NAT (the application server can see the client source IP in the TCP communication).
Two more fields are required to be configured. click the virtual IP already created on step 1 and set the TCP port 80 in the field virtual port. finally, click on the Apply button.
Following our example of configuring a L4XNAT farm:
Name: JDEdwardsL4
Virtual IP: 192.168.56.200
Virtual Port: 80
Profile: L4XNAT
Once the farm is created please edit it, the Global tab is loaded by default, so please click on the “Advanced” view, this view is loaded by clicking on the “Advanced” flag in the upper right section of the Edit form, and new parameters will be shown.
Protocol Type: TCP
NAT Type: NAT
Finally, save changes by clicking on the Apply button.
In case you want to check the traffic passing through this farm please enable Log, but take into account that all the traffic will be saved in the log file /var/log/syslog, additional free space will be required in disk. We only recommend enabling logs in case of troubleshooting.
Let’s check now the service Tab, this section of the Application Delivery controller configures the communication between the Load Balancer and the backend section.
We want to avoid any loss of session, if it happens the user could experience a login requirement randomly, it is because the backend server is changing in any request sent by the client, with this behavior we could experience some loss of critical data, so we will configure the Session Persistence choosing IP: Source IP, and the persistence session time to live to 1200 seconds (20 minutes) those parameters will keep the same client connected to the same backend server during a period of time, if the client doesn’t generate any traffic in 20 minutes, the session will be deleted on the load balancer session table, each time that the client passes through the load balancer this timeout counter will be reset to 0.
Step 3: Configure a backed health check with Farmguardian
In L4XNAT profiles the configuration of farmguardian is mandatory in case we want to detect any failure in the backends, this advanced check can do more than a simple TCP bind against the backend ports and executes HTTP requests analyzing the response to decide finally that the backend is UP and working properly, then it can continue receiving traffic.
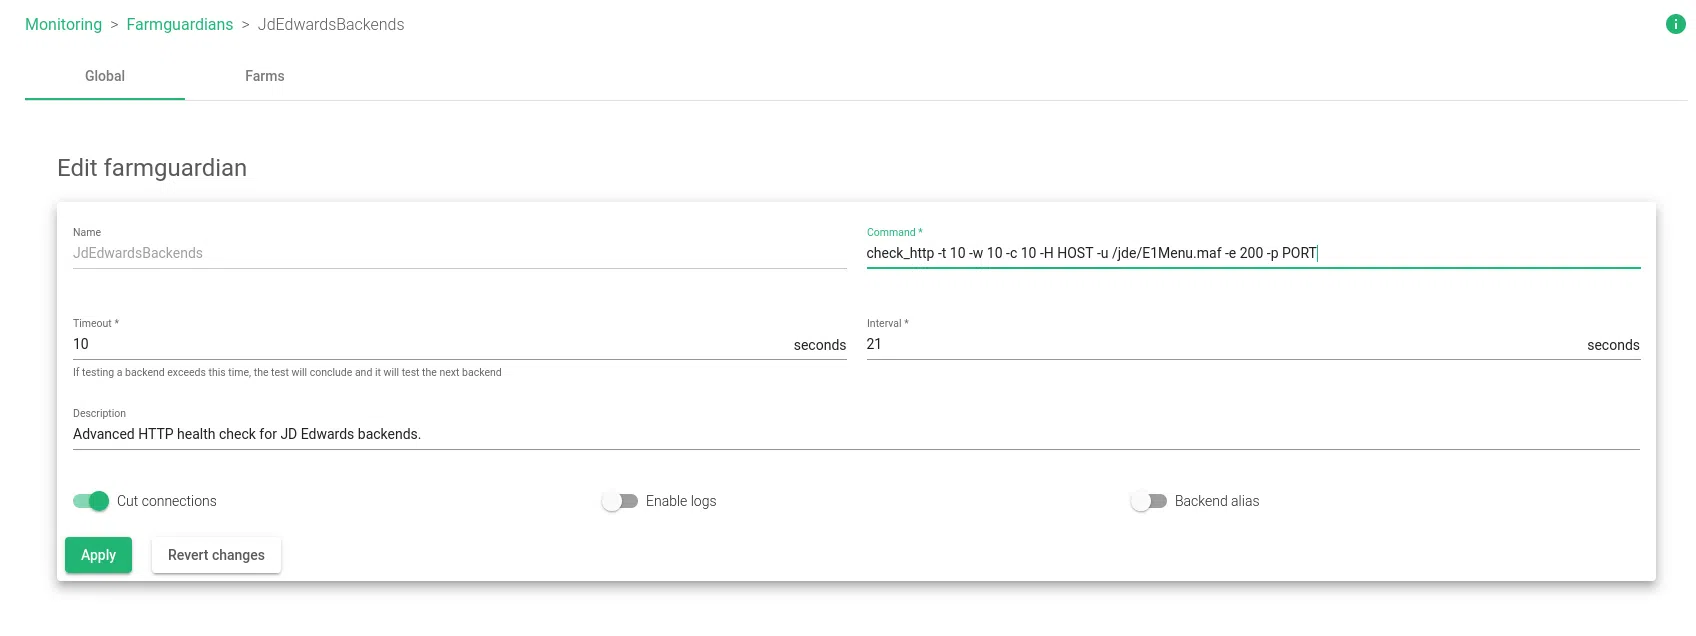
Go to web GUI, section Monitoring >> Farmguardian and create a farmguardian health check with the name JDEdwardsBackends, use the following parameters:
Finally, click on Apply.
The “check_http” command used is explained below:
- -t 10: response time before reaching the TCP connection time out.
- -w 10: response time to result in warning status.
- -c 10: response time to critical status, equal to the warning.
- -H HOST: This is a HOST macro, the string HOST will be changed by each backend IP configured in the backend table.
- -u /jde/E1Menu.maf: url to send a GET: /jde/E1Menu.maf
- -e 200: expecting HTTP response string 200.
- -p PORT: This is a PORT macro, the string PORT will be changed by the backend port configured in the backend table.
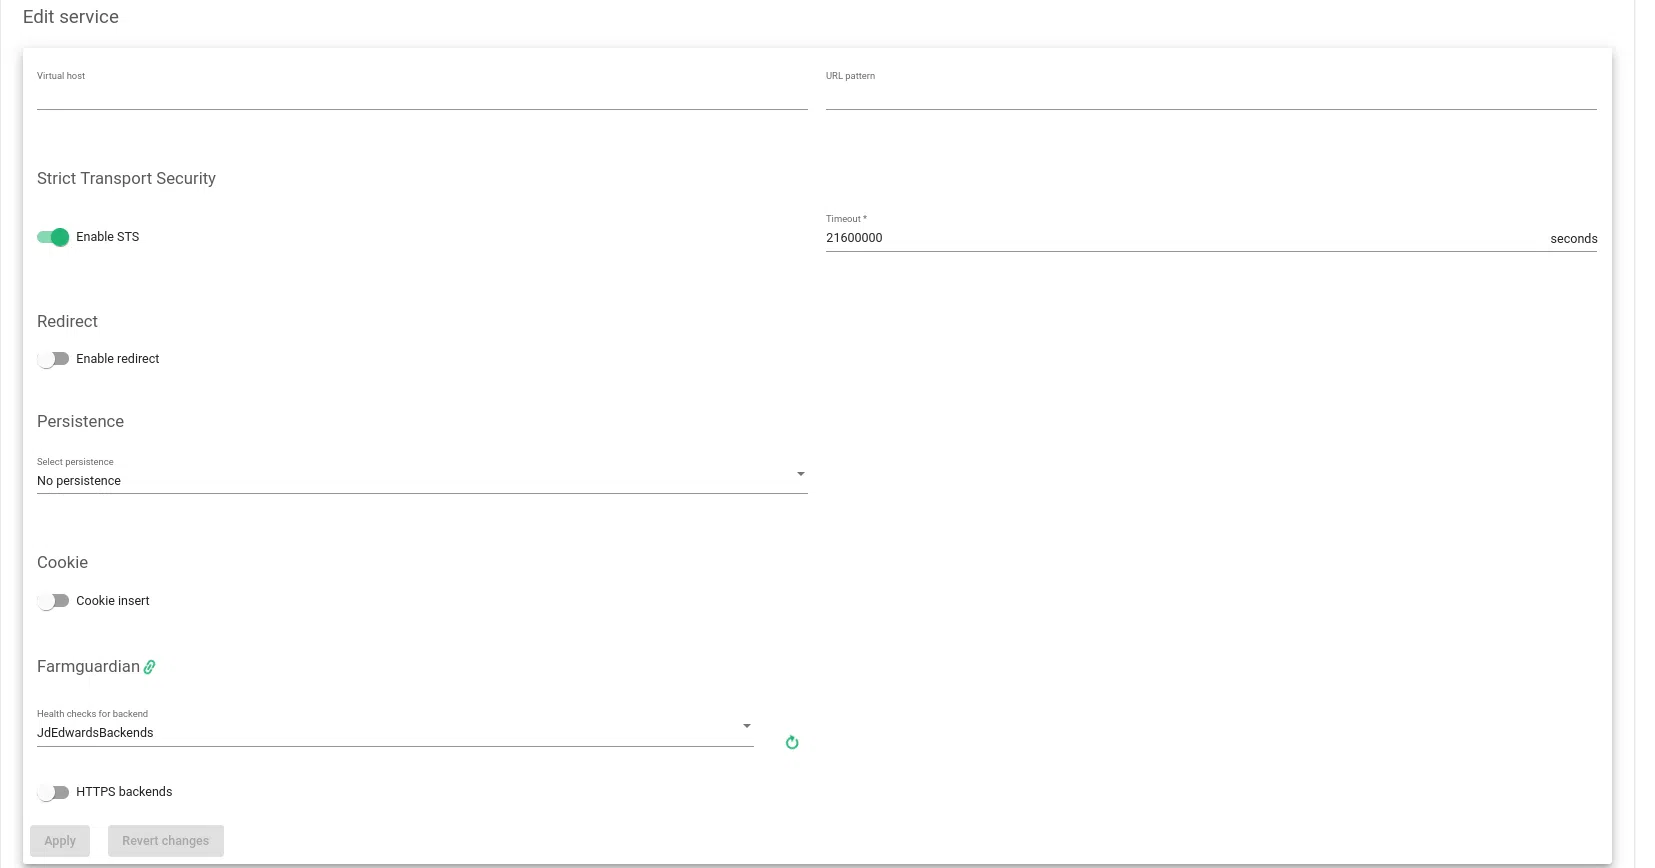
Now come back to the JDEdwards L4 farm, Service Tab, and you will see in the farmguardian section the already created health check script with the name JDEdwardsBackends, please select it.
Step 4: Adding the JD Edwards EnterpriseOne backend servers
The latest step to configure a L4XNAT farm properly for JD Edwards Enterprise One is to indicate in the load balancing service the real servers where JD Edwards is configured and working, in our example the backends 192.168.56.101 and 192.168.56.102 are configured using JD Edwards listening in WebLogic port 8080, please refer to the following screen.
Now the system is ready to load balance JD Edward EnterpriseOne with a SKUDONET L4XNAT farm in Virtual IP 192.168.56.200 Port 80 forwarding traffic in NAT mode to the backends 192.168.56.101 and 192.168.56.102 using backend port 8080. Additionally, each backend is checked every 21 seconds using a customized health check that confirms a 200 OK response for a given URL HTTP request.
Configure the farm in HTTPS, mode 2
Step 1: Create an HTTP(S) farm
In this section, we present a different configuration method, the load balancer will work now like a reverse proxy in user space analyzing the HTTP headers and moving traffic not at the TCP level but at the Application level (HTTP protocol)
Go to the Lateral menu of the web GUI, LSLB >> Farms
Create a new farm in the LSLB section, now, select HTTP as profile, and port 443, configure the descriptive name of JDEdwardsHTTP, and select the Virtual IP 192.168.56.200 (configured as Virtual Interface previously)
Once the farm is created edit it and click on the Global Tab, please change the Listener to HTTPS mode, this change will show new parameters related to the HTTPS protocol configuration, please configure them as shown below:
Taking into consideration HTTPS parameters, Only TLSv1.1 and TLSv1.2 should be enabled. TLSv1.3 is enabled by default.
Ciphers are configured in All mode but if you want to not allow different Ciphers please apply the configuration here.
The Certificates section shows the available certificates in the system, for testing purpose the present certificate by default is good enough but once you move to production we recommend configuring a new certificate, you can deploy a certificate for a CN from 3rd party certifiers or use our Let’s Encrypt connector in lateral menu LSLB > Let’s Encrypt
The other parameters in this Global Tab are configured by default, no further changes are required.
Step 2: Create a service and the backends
In this section, we will configure a new Service as we have done in the L4XNAT section, go to tab “Services” in the HTTPS farm we are configuring, and add a new service with the name Find the JDService
Step 3: Advanced checking
We will proceed here exactly the same way as for the L4xNAT farm, the already created Health check for the L4XNAT farm can be used here. In difference to the L4XNAT profile, the usage of farmguardian in HTTP(S) farms is not mandatory as this profile runs inherent TCP checks in each HTTP backend connection. The L4XNAT profile doesn’t run any checks so if we want to detect a failure in the backends configured in this profile a farmguardian health check is required.
Now the system is ready to load balance JD Edward EnterpriseOne with a SKUDONET HTTPS profile in the LSLB module using the same Virtual IP 192.168.56.200 in TCP port 443 listening in SSL mode, the request is sent to the JD Edwards backends in the WebLogic servers IPs 192.16.56.101 and 192.168.56.102 with Port 8080 in HTTP mode. This configuration is known as SSL Offloading, the communication between clients and the Load Balancer is done in HTTPS Secure Mode but the communication between the Load Balancer and Backends is done in HTTP mode (no SSL).
Final considerations
SKUDONET fully supports JD Edwards load balanced in High availability, so we hope you find this how-to for Load Balance JD Edwards useful; in case you have further doubts and want to discuss any topic related to this implementation please contact us and we will be glad to solve any doubt.


