Contents
Overview
Web application security is not a mere incentive for using SKUDONET ADC. Application security is a fully-fledged functionality that includes a Web firewall, DoS protection, a whitelist, blacklist, and an RBL policy. Implementing these measures is important because the internet has become an integral part of modern life since most people leverage online banking, shopping, communication, entertainment, and e-health.
By taking a comprehensive approach to web security, the SKUDONET appliance can help protect organizations, their users, and their data from a variety of cyber attacks. This article will guide you if you plan to migrate ADC services from loadbalancer.org> to SKUDONET.
Prerequisites
This guide will be of most use to a user who already meets the following benchmarks.
- An instance of SKUDONET ADC must be installed on your workstation, bare-metal, virtual environment, or a cloud platform. Request an evaluation if you don’t have an instance installed yet.
- You must have access to the Web panel. If you don’t, follow this quick installation guide.
- You are an active user of Loadbalancer.org and looking for an alternative.
- Familiarity with HAproxy configurations since Loadbalancer.org heavily depends on them.
- A virtual server is essential for distributing traffic to backend servers. If you haven’t created one, read: Layer 4 and Layer 7 Virtual Server Configuration
Basic concepts
Real servers: These are physical servers, virtual private servers, or containerized environments hosting and serving an application. These servers are called Backends when using SKUDONET ADC.
SSL Termination: To effectively perform content switching, the load balancer must have the ability to read header content from client requests. A load balancer may use this information to make rewriting and redirection decisions and also use it for implementing security checks. SKUDONET ADC provides the same feature as SSL offloading.
Virtual Services: This section contains listeners that receive external traffic from clients through an IP and Port. The load balancer may use the traffic to perform security checks, load balancing, SSL acceleration, etc. A virtual service is defined as a Farm when using SKUDONET ADC.
High Availability: This idea limits the chances of downtime of a web service by failing over to an identical reductant system that is up. The primary one is a Master node, while the redundant one is a Backup/slave. SKUDONET load balancer uses a Cluster to deploy node pairs necessary for failover.
Reports: The Reports section provides more in-depth analytics about traffic monitoring through an appliance. The SKUDONET Monitoring function implements a similar purpose by providing daily, weekly, monthly, and yearly data through graphs.
Cluster configuration: This section is responsible for traffic management within a local network. SKUDONET load balancer uses the LSLB module for controlling local traffic.
Health check scripts: Health checks play a salient role in monitoring the availability and performance of application servers and the applications themselves. SKUDONET uses Farmguardian to monitor Layer 4 and Layer 7 applications.
System Overview: This interface displays information about resource usage by the appliance, like networking, memory usage, and system load usage. SKUDONET’s dashboard displays real-time data about RAM, CPU, and Network adapters for monitoring inbound and outbound traffic.
Example configurations: GSLB configurations
According to Datareportal, global internet traffic has shown steady growth with a 4.95 per cent increase in 2021 alone. This accounted for over 192 million users increasing demand for security, reliability and high availability of resources. With more users accessing the web, corporations must build fault-tolerant data centres with the ability to perform automatic data centre recovery in case one active data centre goes down.
The essence of implementing GSLB is to distribute traffic across various data centers located in different geographies. With this design, users experience low latency, increasing the browsing experience since the requests are queried from the closest data centre. To learn more about GSLB with SKUDONET, Read this documentation: GSLB | Farms
In this section, we describe GSLB in Loadbalancer.org and how you may design a similar DNS load balancer with SKUDONET ADC.
Loadbalancer.org configurations
-
- On the side menu, click on cluster configuration.
- Click on GSLB configurations.
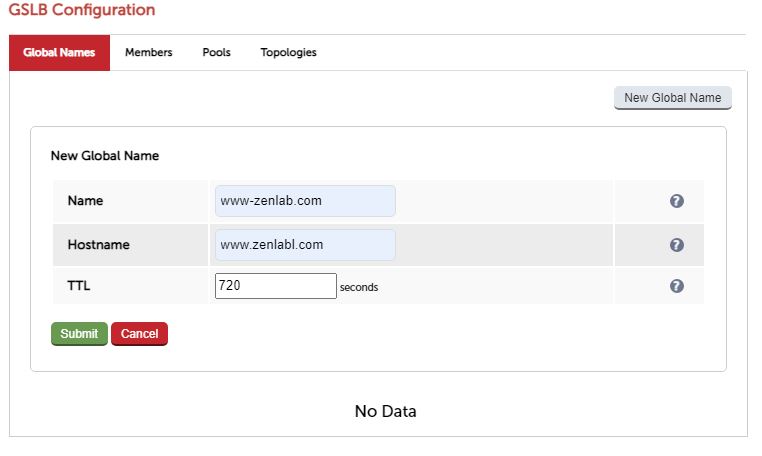
- Within the Global Names section, click on the New Global Name button.
- Enter the name, Hostname and the TTL value.
- Click the submit button.
Add members
-
- Click the Members Tab.
- Click the New Member button.
- Enter the Name and IP of the New Member.
- Click the submit button.
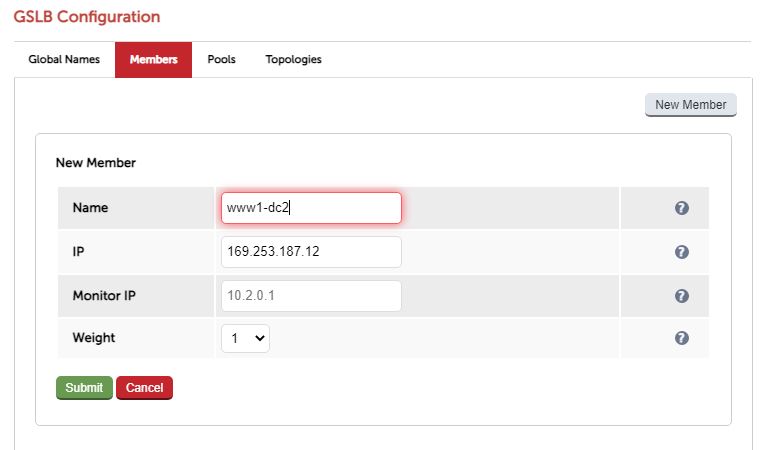
For this example, we will create 2 members.
Add Pools
-
- Click the Pools Tab.
- Click the New Pool button.
- Enter a name that identifies the pool.
- For SSL traffic, Turn the Field Monitor Use SSL from No to Yes.
- Add a global name that you created.
- Within the members section, drag and drop From Available members to Enabled members.
- Click the submit button.
Add Topology
-
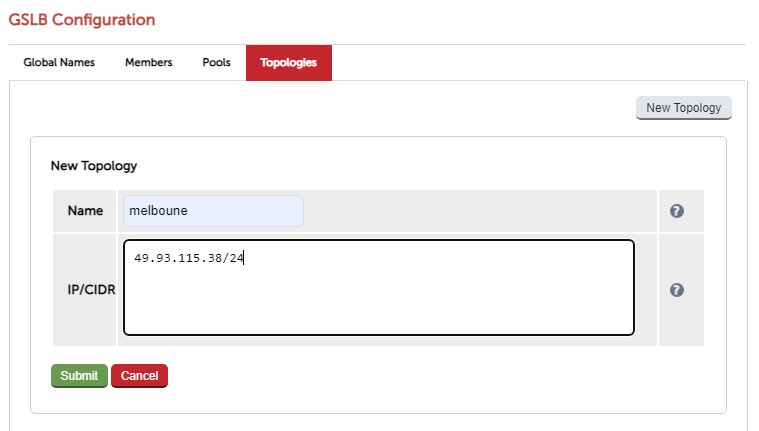
- Click on the Topology Tab.
- Click the New Topology button.
- Enter a Name that identifies a region.
- Enter the IP address in IPV4 format. This will be the load balancer VIP.
- Click the submit button.
SKUDONET configurations
To configure GSLB on SKUDONET ADC:
Add a GSLB Farm
-
- On the side menu, click GSLB.
- Click the Farms option.
- Click the Create Farm button
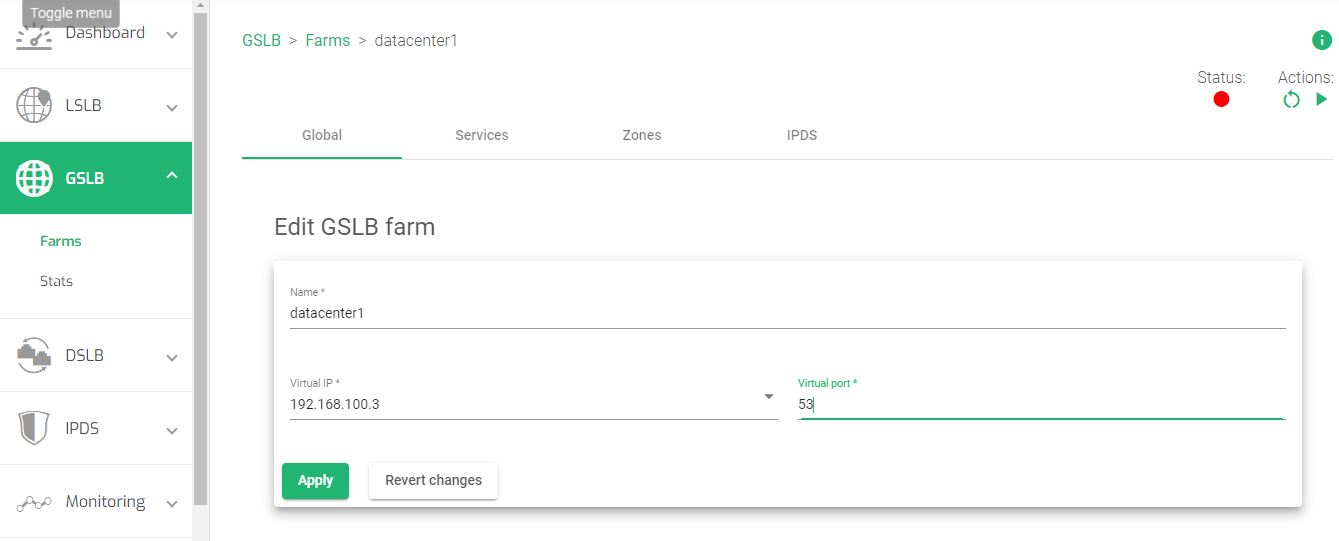
- Enter a Name that identifies a DNS Farm
- Select a virtual IP Address
- Enter the Port number 53.
- Save the configurations by clicking the Apply button.
Add a service
-
- Click the Services Tab.
- Click the New Service button to add a service.
- Enter the service Name in the form.
- Select any of the load balancing algorithms, whether Priority or Round Robin.
- Click the Apply button to create a service.
- Click the service you just created to open it.
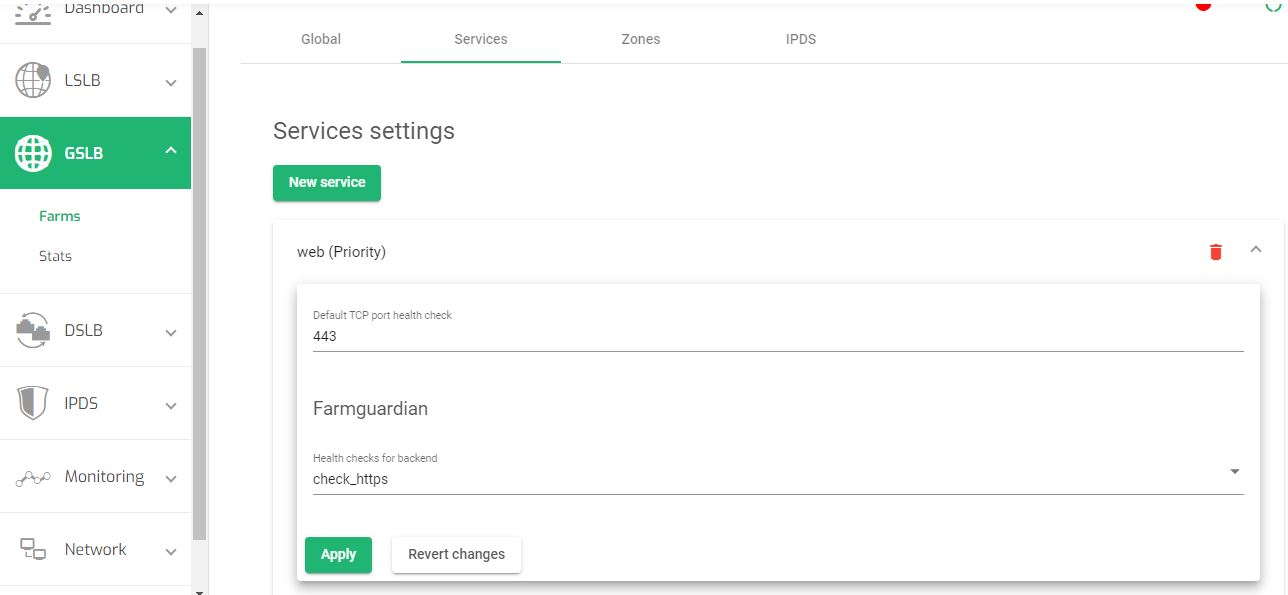
- For HTTPS traffic, change the TCP Port to 443.
-
- Change health checks for Farmguardians to check_https.
- Click the Apply button to save the configurations.
Add the IP addresses of the data centers
-
- Click the Edit button beside the provided IPs.
- In the Alias field, leave the field as Custom IP.
- Enter the IP address of the Datacenter you want to send traffic.
- Repeat the process from line 17 to add other data centres.
Add DNS zones
-
- Click the Zones tab.
- Click the New Zone button.
- Enter a domain or subdomain you intend to use.
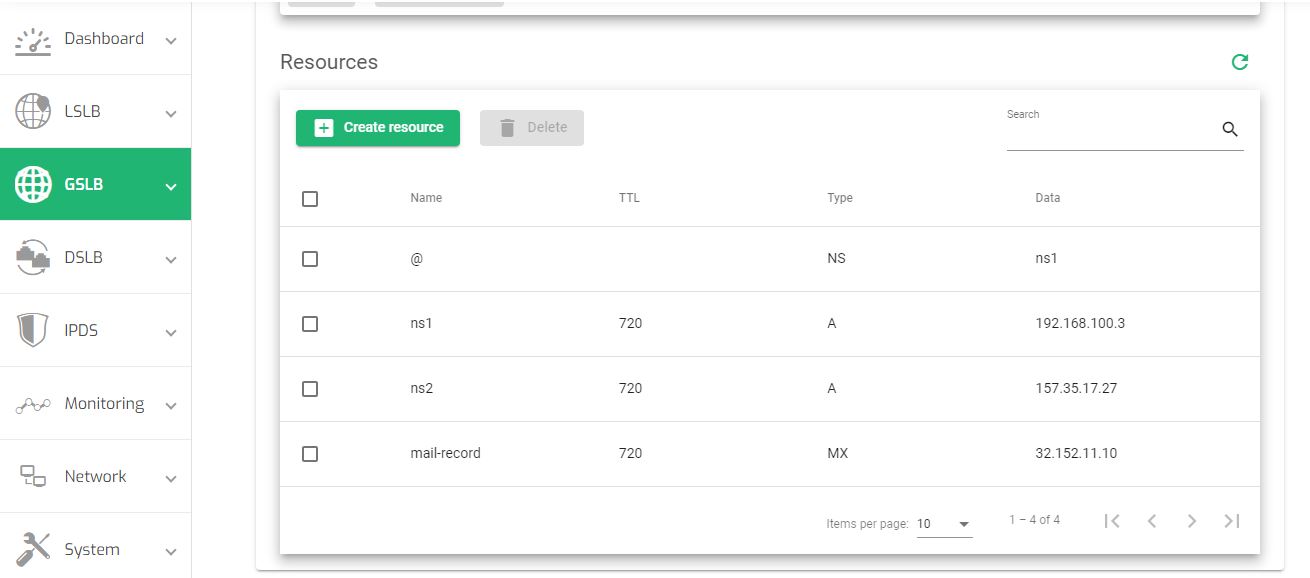
- Click on the domain you just created to edit it. The default name server is ns1. This acts as the Start of Authority(SOA), and the Resources section adds more DNS records.
- To add a DNS Record for identifying the name servers, click the Create resource button.
- Enter a Name that identifies a record.
- Add the TTL value in seconds.
- Select the Type of the record.
- Within the Data field, enter the value for the record.
- Click the Apply button to save the configurations.
- Restart the Farm for the DNS load balancer to work.
For more details about GSLB load balancing, read this guide: GSLB | Farms
Example configurations: High Availability
High availability offers the capability of a system, network, or service to remain operational and available for use during a given period. In other words, high availability means that a system must be reliable and able to handle a high volume of traffic or requests without experiencing significant downtime.
Overall, high availability is important for ensuring that systems and services are reliable and available when needed, which can help organizations maintain their reputation, protect their data, and continue to operate effectively.
Loadbalancer.org configurations
-
- On the side menu, click cluster configuration.
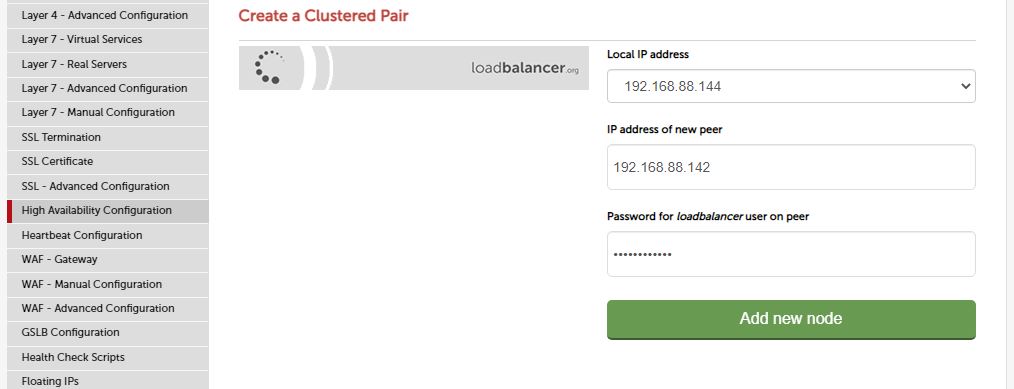
- Click High Availability Configuration.
- The Local IP address is the address of the appliance you’re currently using.
- Enter the IP address of the new peer. This IP address identifies the remote that has similar configurations as the master node.
- Enter the password for the load balancer user on the peer.
- Click the Add new node button.
- Wait for a few seconds for the load balancer to configure.
- After finishing the configuration, click the Restart Heart button for the configurations to take effect.
SKUDONET configurations
For high Availability configurations in SKUDONET ADC:
-
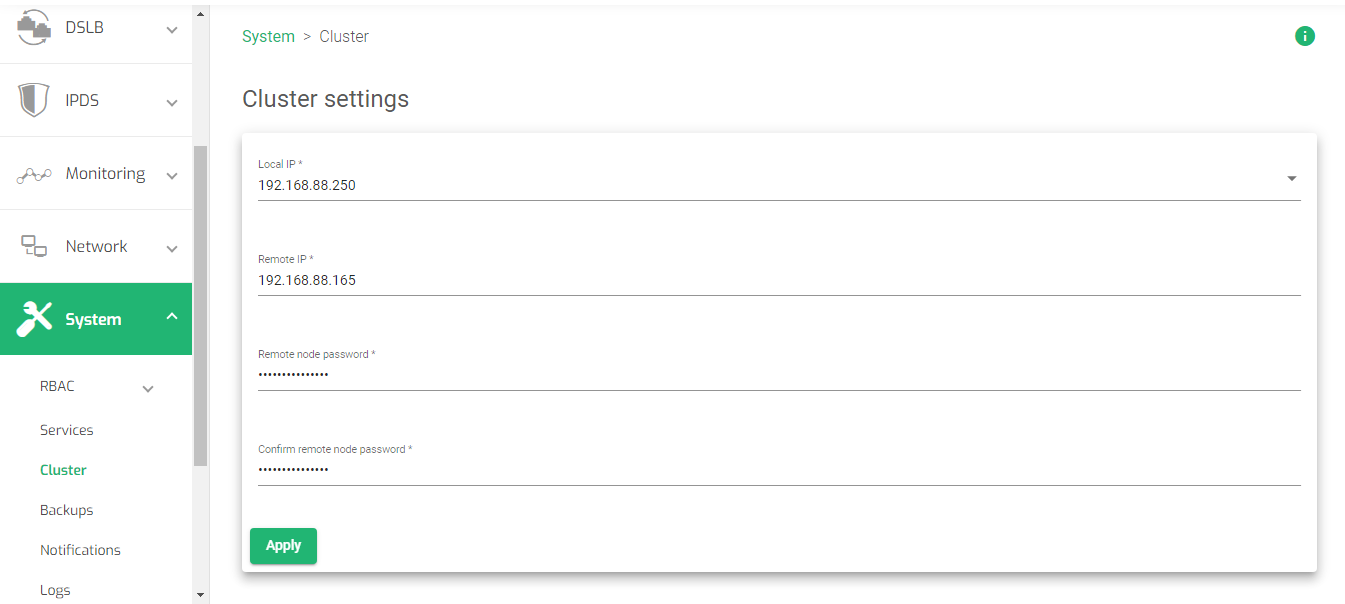
- Click the System Item on the menu.
- Click the Cluster option.
- For the Local IP, select the IP address of the local appliance.
- Enter the Remote IP address of the slave node.
- Enter the Remote node password.
- Reenter the remote node password.
- Click the Apply button to save the configurations.
-
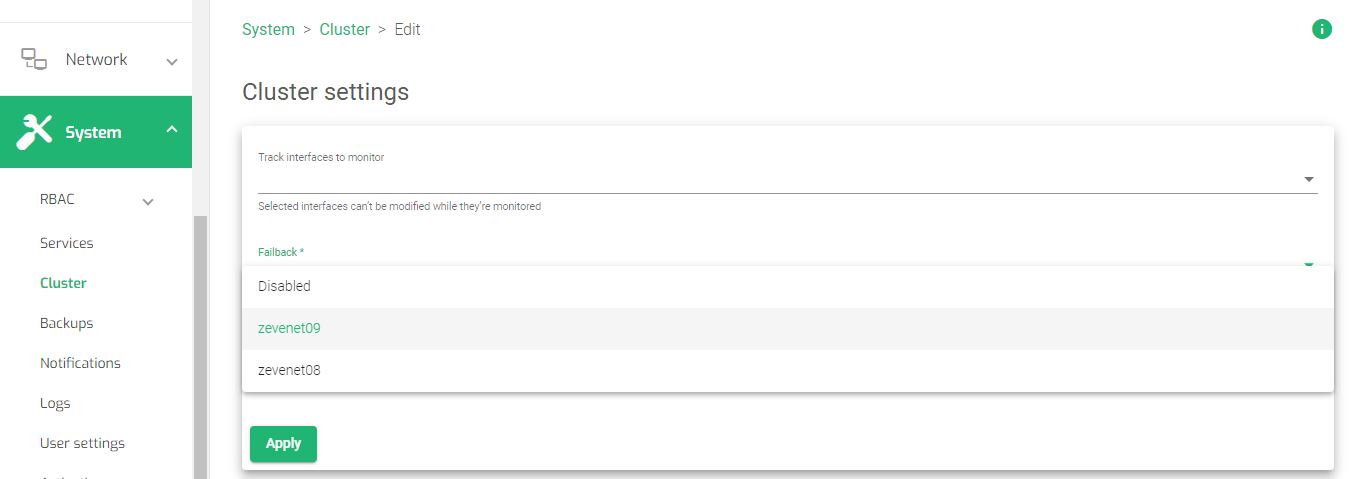
- At the left side of the Cluster service table, click the Edit Icon.
- Within the Cluster settings, change the Failback from default to that of the local node. For Example, if the hostname of the local node is Skudonet08, then change the failback to Skudonet08.
- Click the Apply button to update the changes.
For more details about cluster configurations in SKUDONET ADC, read System | Cluster
Additional Resources
Using the Let’s encrypt program to autogenerate an SSL certificate.
Datalink/Uplink load balancing With SKUDONET ADC.
Web application protection from DDoS attacks.
Application, Health and Network Monitoring in SKUDONET ADC.

