
Contents
Intro
One of the challenges in a technology company like SKUDONET is keeping technology up-to-date. This is the first step to creating innovative and reliable solutions. For that reason, all our products have a lifecycle of 5 years. The end of life for SKUDONET 6 is approaching, and it is time for SKUDONET 10.
Consideration
This restore backup procedure from SKUDONET v6 to SKUDONET v10 works since SKUDONET v10.0.2 or higher version, please ensure you are running an updated SKUDONET v10 with at latest version.
You require temporary licenses for the initial development of SKUDONET v10, once you confirm the migration from SKUDONET 6 to SKUDONET 10 worked properly, migrate the definitive license from SKUDONET 6 to SKUDONET 10, the SKUDONET 6 will reach an out of service automatically.
New Features
SKUDONET 10 includes many features compared to its predecessor SKUDONET 6. The main difference is that version 10 is more optimized for networking and virtualization purposes, with many improvements at the kernel level. Additionally, SKUDONET 10 includes enhancements in the Local Service Load Balancing (LSLB) module for the HTTP profile. This new version makes the HTTP(S) profile cloud-native, adapting the SKUDONET Operating System for hybrid clouds.
Moreover, the look and feel of the web GUI have also undergone significant changes as User Experience (UX) is a priority for our frontend department. The new version includes better integration with logs information and parsing and better integration of command-line tasks.
If you want to read more about the advantages of SKUDONET v10, please refer to this article: SKUDONET 10 Enterprise Edition.
Environment
The current article describes the correct procedure to migrate from SKUDONET v6.3 to SKUDONET v10 with minimal impact on an environment where SKUDONET v6.3 works in a cluster. As an example, we manage the following situation:
Current Production Environment with SKUDONET v6.3:
- Hostname: skudo1 with eth0 IP 192.168.100.100/24
- OS Version: SKUDONET v6.3.11 (definitive license)
- Hostname: skudo2 with eth0 IP 192.168.100.101/24
- OS Version: SKUDONET v6.3.11 (definitive license)
Cluster Objects:
- eth0: 192.168.100.105
- Farm Name: ReverseProxy
New Environment
- Hostname: skudo1 with temporary IP eth0: 192.168.100.110/24
- OS Version: SKUDONET v10.0.2 or later (temporary license)
- Hostname: skudo2 with temporary IP eth0: 192.168.100.111/24
- OS Version: SKUDONET v10.0.2 or later (temporary license)
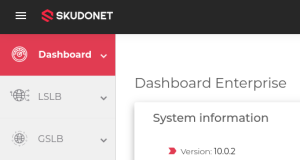
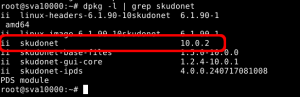
Please ensure you applied the latest hotfix to the current SKUDONET v10 Appliance. At the time of this article’s creation, SKUDONET v10.0.2 had been released. The version of the appliance can be checked in the dashboard.
Or from the command line:
dpkg -l | grep skudonet
To apply the latest hotfix, ensure your system has an internet connection and can reach https://repo.skudonet.com and https://certs.skudonet.com. If so, on the command line execute the following steps:
checkupgrades

checkupgrades -i
The first command will check for pending packages, and the second command will install the pending packages detected. Now the system is ready to continue.
Create Backup of SKUDONET v6.3 and Apply to SKUDONET v10.0
- On the current nodes of the cluster of SKUDONET v6.3 go to the section SYSTEM > Services, Global section, and ensure that the property “Proxy of the new generation” is disabled, if not, please disable it. This feature was deprecated in V10 because of the instability and the new properties have been migrated to the current HTTP(S) profile.
- Go to the host skudo1 version 6.3 (currently in production), inside the web GUI, go to SYSTEM > Backups and create a backup with the descriptive name “skudo1v63” as shown below:
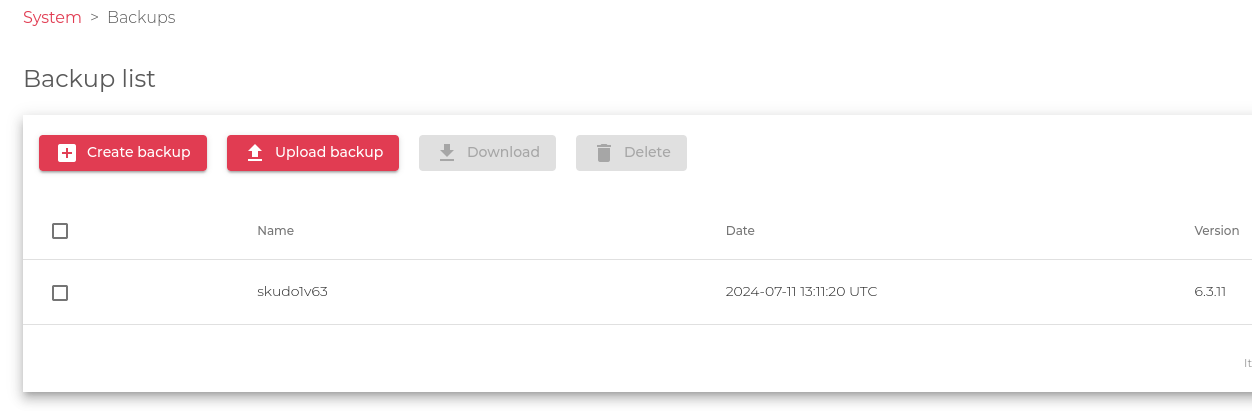 Download the backup to the local directory; a new file will download with the name: backup-skudo1v63.tar.gz
 - Go to the SKUDONET v10 node skudo1 with temporary IP 192.168.100.110, in the same web GUI section SYSTEM > Backups upload the previously created file:
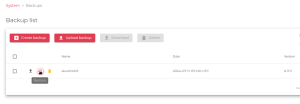
- Click on “upload backup”, enter a descriptive name for the file, and upload the already created file named backup-skudo1v63.tar.gz that is currently in your local system. A new file will be listed in the backups view as shown below.
- Refer to the field Version in this view. This new system runs SKUDONET v10.0.2, but the uploaded backup file shows version 6.3.11, where the backup was created. Move the mouse to the line of the uploaded backup, on the first column and click on Restore action as indicated below:
- Click on “upload backup”, enter a descriptive name for the file, and upload the already created file named backup-skudo1v63.tar.gz that is currently in your local system. A new file will be listed in the backups view as shown below.
-
- The system will uncompress the content of the file and apply the configuration.
- If the process doesn’t conclude in 60 seconds, please refresh the view, and you will see the newly imported objects like Virtual Interfaces, certificates, and farms.
- Stop the current two production nodes of the cluster with version 6.3 and reboot this host skudo1 with version 10, where the backup has been applied. The temporary IP for this node 192.168.100.110 will be released as the system will start with the previous IP 192.168.100.100 (skudo1).
- Go to section “SYSTEM > Services” and verify all the required services are configured properly.
Take into account that the cluster has not been migrated, so now we need to prepare the backup node before configuring the cluster service.
If you are running SKUDONET V10 standalone, then you don’t need to configure the cluster and your migration concluded successfully. However, the SKUDONET team always recommends keeping the system in high availability with two nodes working as a cluster.
Now, go to the node skudo2 and configure the interfaces in the same way as the hostname skudo2 with Version 6.3, the same number of NICs and the same IPs. In our example, change the IP of eth0 from 192.168.100.111 (for temporary usage) to 192.168.100.101.
If you run more than one NIC, VLANs, or Bonding Interfaces, they need to be configured with the same IP as skudo2 v6.3.
Once eth0 is properly configured with IP 192.168.100.101, go to host skudo1 v10 (192.168.100.100), where all the configuration has been loaded, and create the cluster from the section SYSTEM > Cluster as shown below:
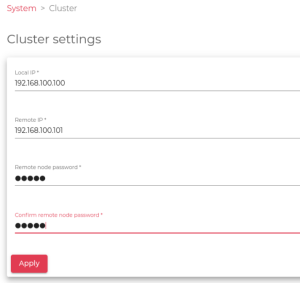
After a few seconds, the cluster should start, keeping skudo1 v10 as MASTER (IP 192.168.100.100) and skudo2 v10 as BACKUP (IP 192.168.100.101).
If you experience issues or want to follow all the actions executed by SKUDONET internals, refer to the file /var/log/syslog.
If you have a technical support contract and require assistance, please contact the SKUDONET support team by opening a new case at https://central.skudonet.com/. The Engineering team will be glad to guide you through the migration process or address any doubts before starting.
After a few days of working with the new environment, if everything is going as expected, please request the support team to change the definitive licenses from the previous SKUDONET appliance v6.3 to the new SKUDONET Appliances v10.
Revert Changes
In case you experience unexpected issues in SKUDONET v10, please revert the changes with the following procedure:
- Create a support save of the current failed node (v10) from the web GUI in the section SYSTEM > Support save.
- Open a new case in https://central.skudonet.com/ and attach the generated tar.gz file. Add detailed information about the experienced failure and indicate all the tests you have done. The more information you include in the support request, the easier it will be for the SKUDONET Engineers to find the problem.
- Now stop the nodes skudo1 and skudo2 v10 and start the previous cluster skudo1 and skudo2 with version 6.3. The system will continue working as before the migration.
Need Support?
If you need further assistance during your migration from SKUDONET 6.3 to SKUDONET 10, our support team is here to help. Please contact us at SKUDONET Support.
