Overview
This article outlines the process of updating Skudonet 6 Cluster or a higher version while aiming to minimize downtime during the update procedure. Depending on your configured services, you might experience a minimal amount of downtime or even no downtime at all.
If you have not yet configured a cluster, there’s a possibility that downtime could be extended to a maximum of one minute in the worst-case scenario.
Please note that if you’re currently using a version older than 6, you should review whether your cluster is ready for migration.
Environment
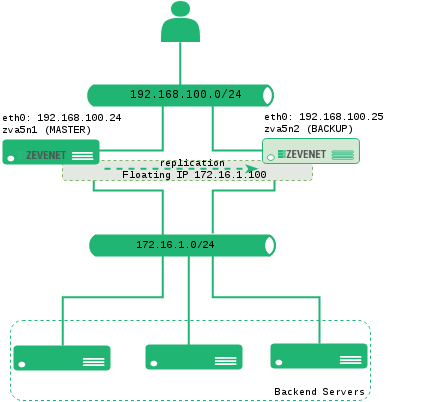
To provide a better understanding of the update procedure with minimal downtime, the following environment has been created:

Requirements from EE 6
To perform the update, an internet connection is required to check for pending packages in our repositories. If your system cannot connect to the internet, you should refer to the offline update procedure using the Skudonet 6 Offline update packages.
Update Process
Starting from SKUDONET 6.0.0, the update procedure is managed using the checkupgrades tool.
Before proceeding, it’s strongly recommended to create snapshots of both nodes within the cluster. These snapshots will serve as a safety net in case you need to revert any changes.
0. Begin by navigating to the node with the MASTER role. Terminate the zeninotify process, which handles the replication of configuration changes and locks sync requests from the backup node, using the following command:
[master]root@zva5n1:# kill -9 `ps -ef | grep zeninotify | grep enterprise.bin | awk {'print $2'}`
On the master node, restrict incoming SSH connection attempts from the BACKUP node. Edit the file /etc/hosts.deny and append the line below, replacing 192.168.100.25 with your BACKUP node’s IP address. Save your changes. This action will block in the MASTER node any try of connection to ssh service from BACKUP.
(in the MASTER node, file /etc/hosts.deny)
sshd: 192.168.100.25
1. Move to the BACKUP node (e.g., zva5n2) and apply the update by following the instructions provided in the update package. Alternatively, if you’re using Skudonet 6.0.0 or a later version, you can execute the checkupgrades tool as shown below:
[backup]root@zlb:# checkupgrades
[backup]root@zlb:# checkupgrades -i
2. After completing the update process on the BACKUP node (zva5n2), thoroughly review the update outcome for any errors. If any installation errors are detected, promptly create a support ticket and include the output of the installation process for further assistance.
3. If the update on the BACKUP node concludes successfully, proceed to the MASTER node (zva5n1) and apply the update in a similar manner as detailed in step 1. As the update is finalized, the service will be restarted to implement the changes. During this process, the service will automatically transition, with the former BACKUP node now assuming the role of the new MASTER.
4. Upon confirming a successful update without any errors, remove the SSH access restriction on the old MASTER node (zna5n1) by deleting the line added in step 0.
5. If fail-back functionality is enabled, the MASTER role will automatically shift back to this node. Alternatively, if fail-back isn’t enabled, the MASTER role will remain assigned to the second node (zva5n2).
6. To forcibly revert the MASTER role to node zva5n1, enable maintenance mode on node zva5n2. This action will prompt the MASTER role to transition back to node zva5n1, as it was before the update.
Upon completing the migration process, disable maintenance mode on both nodes. Verify the current MASTER and BACKUP nodes, and continue system management from the MASTER node. Ensure that the temporary changes made to /etc/hosts.deny are removed. Confirm the cluster service status through the SYSTEM > Cluster view.
This completes the update of Skudonet with no downtime!

