Contents
Introduction
While connecting to the internet via your chosen Internet provider assures a level of security, the situation changes when connecting to a private service. How can you guarantee that your data remains secure from client to server within a public infrastructure? This is precisely where VPN services or Virtual Private Network technologies come into play. These technologies establish a secure connection between endpoints, ensuring that external entities cannot intercept the traffic and access sensitive information.
VPN services offer a range of capabilities, including:
Confidentiality: Safeguarding your data by employing encryption, thereby preventing unauthorized access.
Authentication: Verifying the legitimacy of devices involved in the point-to-point connection.
Integrity: Ensuring the integrity of VPN packets during transit, guarding against unauthorized alterations.
Anti-replay: Preventing the interception and subsequent retransmission of traffic by malicious actors attempting to impersonate legitimate devices or users.
Numerous implementations are available in the market, based on both proprietary and open standards. In this article, we’ll focus on open solutions. Here are some of the most notable ones:
IPSEC: This has emerged as the de facto standard for VPN installations on the Internet. It encompasses a wide range of cryptographic algorithms and has not been plagued by significant vulnerabilities.
OpenVPN: A highly popular option that doesn’t strictly adhere to standards. It employs proprietary security protocols and supports TLS/SSL using OpenSSL, along with a diverse array of cryptographic algorithms.
L2TP: An extension of PPTP, L2TP can utilize IPSec for its security layer. While it was more commonly used in the past by ISPs, there are now superior alternatives available that offer better performance.
Wireguard: This stands out as an incredibly fast and easy-to-install VPN solution. It leverages cryptographic algorithms already embedded in the Linux Kernel, utilizes UDP, and is configurable on any port.
Creating a Scalable VPN Environment
This article outlines the process of establishing a load-balanced and highly available setup for VPN services using the SKUDONET Load Balancer. While the focus here is on Wireguard, which operates on port 51820 UDP, the principles can be extended to other similar solutions employing different protocol(s) and port(s).
While this article does not delve into the specifics of configuring the VPN server, certain crucial aspects must be considered to successfully scale VPN services with high availability:
Replication of the VPN server configuration files across all VPN servers that will be included in the balancing setup.
NATing of VPN clients’ traffic within the VPN server. This ensures that both inbound and outbound connections from a given client go through the same VPN server within the pool.
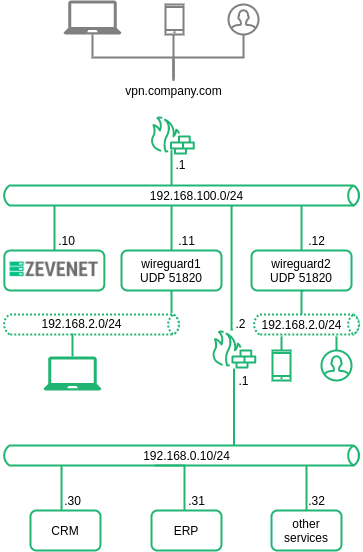
The subsequent diagram illustrates the architecture that enables scalability:
1. Two Wireguard servers sharing identical configurations.
2. Each Wireguard server establishes the same private network 192.168.2.0/24.
3. NATing of each VPN client is carried out using the IP of the respective VPN server.
4. Clients connect to a single public IP vpn.company.com via 51820 UDP. This connection is routed to the SKUDONET load balancer (192.168.100.10).
5. SKUDONET distributes client connections across available VPN servers, ultimately establishing a tunnel with one of the servers.
This article will provide detailed guidance on configuring the VPN scalable service with SKUDONET in two ways: through the Web GUI and via the Command Line Interface.
Configuring VPN Virtual Service with SKUDONET
This section outlines the configuration process using the command-line interface for setting up the VPN virtual service with SKUDONET.
It’s important to note that VPN protocols necessitate the use of Persistence Session capabilities. This ensures that the same client remains connected to the same Backend for a certain period, even if no traffic is generated by the client.
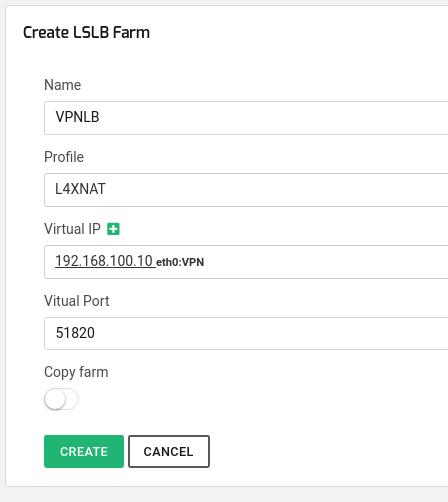
To create the VPN virtual service, you’ll need to establish a new farm (we will name it VPNLB for this example) using the l4xnat profile that listens on 51820 UDP. This farm should be bound to the VPN Virtual IP 192.168.100.10 and set in sNAT mode. This firewall will perform Network Address Translation (NAT) for connections from clients. You can achieve this using the following command:
zcli farm create -farmname VPNLB -vip 192.168.100.10 -vport 51820 -profile l4xnat
Alternatively, you can perform this configuration via the web GUI:
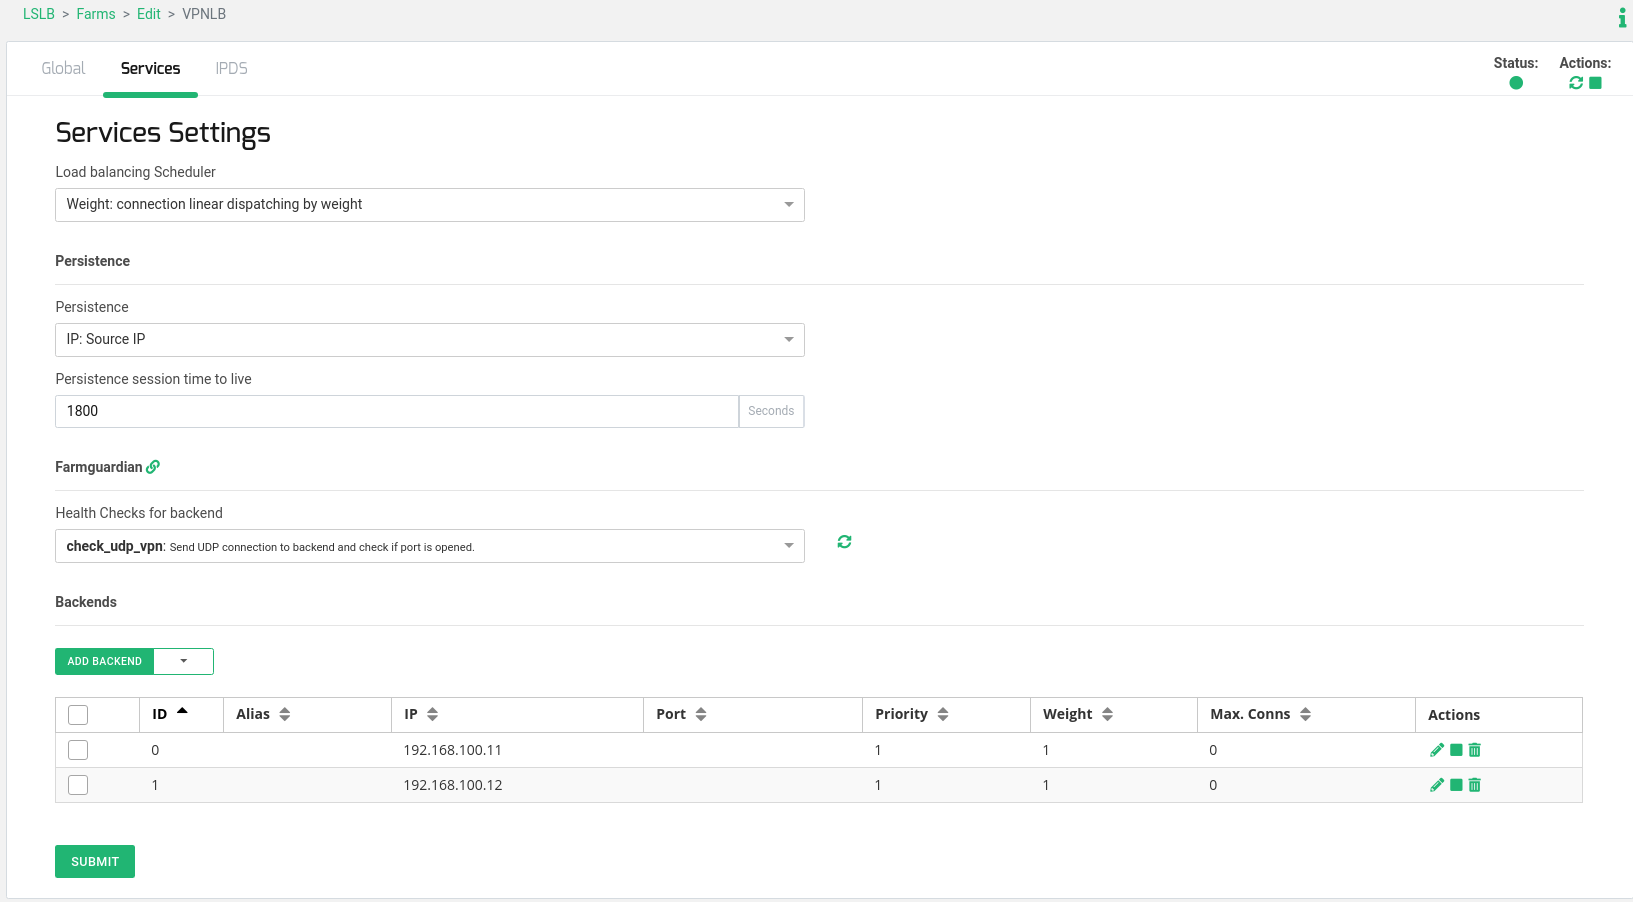
Modify the Global Parameters of the farm to use UDP protocol, and configure Persistence Session based on Source IP and a simple Load Balancing Algorithm using Weight:
zcli farm set VPNLB -protocol udp -nattype nat -persistence srcip -ttl 1800 -algorithm weight
Or you can perform this configuration via the web GUI:
Next, add two Backend Servers with IP addresses 192.168.100.11 and 192.168.100.12 to the farm you’ve just created for the VPN load balancing service. The Port configuration is not necessary as the l4xnat profile will use the same port as the Virtual Port configured:
zcli farm-service-backend add VPNLB default_service -ip 192.168.100.11
zcli farm-service-backend add VPNLB default_service -ip 192.168.100.12
Or you can perform this configuration via the web GUI:
To ensure that only healthy backends are selected, configure a simple health check for the backends that ensures port 51820 UDP is available on the backend side. Make a copy of the existing generic health check named check_udp and edit it. It’s recommended to change the interval field to 21 seconds, considering each health check uses a timeout of 10 seconds, so 10 seconds * 2 backends + 1 second = 21 seconds:
zcli farmguardian create -copy_from check_udp -name check_udp_vpn
zcli farmguardian set check_udp_vpn -description "VPN check for UDP 51820" -interval 21
Or you can perform this configuration via the web GUI:
Finally, add the created health check called check_udp_vpn to the VPNLB farm:
zcli farm-service-farmguardian add VPNLB default_service -name check_udp_vpn
DDoS Attack Mitigation with IPDS Module
VPN services are often targeted by attacks and cybersecurity threats due to the potential remote access they provide to organizational networks. For this reason, it’s advisable to enhance our scalable VPN service with a security system to safeguard our organization against external attacks. This section explains how to use the SKUDONET IPDS module to mitigate DDoS attacks on public VPN services effectively.
Two different protection methods are detailed in this section, offering better results for this type of service: IP protection through whitelists and connection limits.
Allowing Access to the Public VPN Service from a Given Whitelist
The usage of blacklists/whitelists can be effective in services where you can ensure that the list of clients is known. For instance, in a public VPN service intended for telecommuting within an organization of a specific country.
To configure a whitelist for Germany and reject traffic from IP addresses in other countries, follow these steps:
1. Go to IPDS > Blacklist and find the blacklist named geo_ES_Germany. Edit this blacklist rule and change the policy field to Allow to use it as a whitelist.
2. In the same list, navigate to the Farms tab and move the farm VPNLB from the Available farms column to Enable farms.
3. Click the Play icon under Actions to enable the whitelist.
4. Go to IPDS > Blacklist and find the blacklist named All. In the Farms tab, move the farm VPNLB from the Available farms column to Enable farms.
5. Click the Play icon under Actions to enable the blacklist.
With this configuration, the geo_ES_Germany whitelist, preloaded in SKUDONET with all IP ranges from Germany, is added to the VPNLB farm. Additionally, the All blacklist contains all other IP addresses, ensuring that if the client’s IP does not match any German IP range, the traffic will be dropped.
Allowing Access to the Public VPN Service with Connection Limits
To apply this type of DDoS protection, it’s important to understand how your public service functions. For instance, Wireguard only uses one UDP connection per client. Thus, if multiple concurrent connections are received from the same source IP, it might indicate that multiple teleworkers are connecting behind a NAT, potentially masquerading traffic, or it could indicate a UDP flood attack. In either case, more than 10 connections per source IP is not considered legitimate traffic.
To configure a limit on concurrent connections per source IP for your VPN virtual service, follow these steps:
1. Go to IPDS > DoS > Create DoS rule. Create a new rule with the name limit_per_source_IP and select the Rule type total connection limit per source IP. Click Create.
2. In the rule editing form, set the desired concurrent connections limit in the Total connections limit per source IP field. In our case, this is set to 10. Click Submit.
3. Go to the Farms tab and move the farm VPNLB from the Available farms column to Enable farms.
With this configuration, you have limited the number of concurrent connections per source IP to 10. Any client IP attempting to establish more than 10 VPN connections is considered suspicious. If you can ensure that more than one client will never establish connections through the same public NAT, you can configure the limit_per_source_IP rule to just 1.
With these configurations, your scalable, highly available, and secure VPN service with SKUDONET is ready to go!


